

Project 1 - Lady Chris from Suikoden 3
This was my very first armoring project ever, and by and large, the most difficult thing I have ever tried. After attempting to mold the breastplate out of fiberglass, I was tempted to swear off armor-making forever, (before I discovered the magic of styrene, which I first put to use in this project.) Here's roughly, the steps I took to create this armor at https://sky.pro/media/ux-ui/.
I know in an earlier version of this tutorial, I said to coat the inside and outside with a stiffener or glue of some sort when you reached this point. Actually, as it turns out, you don't need to do this if you curve the armor slightly in the direction you want it to curl in while hotgluing it. (The surface tension of the plastic will make it hold it's shape on it's own, although you want to be careful and not curve the armor TOO far, as the foam might sproing back and create ripples in the plastic surface of your armor. Not sure what I mean by this? Just glue a large scrap of plastic to a large scrap of foam, curl them both into a tight cylinder and see what happens after it cools.)
The closures I eventually put on the side of the armor I made using craft foam and huge, oversized snaps. Closures can also be made using straps and buckles, velcro, or anything else your imagination can come up with. (One thing: armor fastenings must always be strapped on over the outside. The armor sections will buckle outwards if you try to put the fasteners on the inside.)
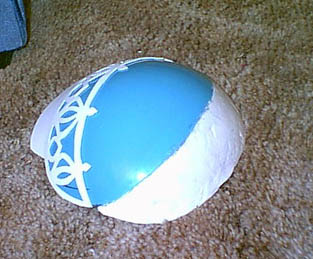
So that was how I constructed the breastplate for my armor. The next thing I found myself having to make were the pauldrons, (the bits of armor which cover and protect the shoulders). These I made by buying a cheap plastic bowl from a thrift store and cutting two round, dish-like pieces from it. They weren't big enough, so I had to add a section to them using molded friendly plastic. (In a later version of this armor, I used huge, oversized 10" plastic Christmas ornaments cut to shape. I could've made the pauldrons using paper mache as well if a plastic source hadn't been available.)
The white, lacelike decoration you see is something I cut out of a 1/8" sheet of craft foam with an X-acto knife --using forceful strokes to minimize the rough edges you usually get when you cut craft foam with an X-acto blade--and then glued to the surface. (After this picture was taken, the brilliant idea came to me to tear off the foam decoration and reattach it to cover the rougher section of the added plastic.) After that, I hotglued plastic sheeting to the surface of the lacelike decoration and carved away the excess. I then painted the pauldron using silver and black Testor's model paint.
The next thing to do was to make a method of attaching it to the torso of the armor, which I did using strips of leather with fake clamps (which I constructed of foam, plastic and oversized snaps.) With the upper portions of the armor being largely finished, I then moved onto the next section of the armor: the Foot Armor.
After the shoes, I went on to make... The Gauntlets...
>Oya.... Obviously, this was the part of the costume which gave me the most trouble. Here's how they went down...
If y'all have any questions about this project, feel free to e-mail me, or better yet, join the Cosplay.com Message Forum and leave me a Private Message.
And now, onto Project #2--My second stab at plastic and foam based cosplay armor:

Lady Chris from the video game Suikoden 3.
Kick-ass armor version.
First thing I had to do was to make a pattern. This I did by draping newspaper (tagboard would've been preferable, but I didn't have any) around my body and marked off the edges of the armor, my side and shoulder seams, neck opening, etc. (A friend would've been of great help to me as I was doing this, but I didn't have any of those around at the time either. *Sigh.*) Being that I was a female, I had to make allowances for my...um... chestological area. (To do this, I simply made a hump where the armor meets in front to allow for my bosom and then curved the pattern inwards as the armor sloped down towards the waist.) It's important when making chest armor to give yourself lots of room at the neck (enough to get your head through) and to make sure the shoulderholes are big enough so that your arms have full range of movement. (This is really important, especially when it comes to putting on the armor by yourself. You need to have it so your arms can cross over your chest and reach under the opposite armpits where the armor closures will be.)
At the end of it all, I had something which resembled a bodice (people who've done a lot of sewing should be familiar with that term,) made of newspaper. I cut the bodice on the shoulder and side seams, and down the front seam as well. This gave me the 3 flat pattern pieces that I would need to cut the armor out of foam.
To create foam sheets that would be large enough for me to place my patterns onto, I had to hotglue several 6mm craft foam sheets edge to edge. (In all, I found I needed about 20 8-1/2" x 11" sheets to create the surface area I needed to cut my patterns out.) After cutting out the pattern pieces, I glued them together creating a foam shell which I could then fit to my body. (I had to leave a side seam open so I could actually squeeze my body INTO the shell.) Adjusting for size was easy. In places where the fit was too snug, I just cut away sections where there was too much foam and reglued the newly cut sections together (making sure I took the armor off before I did so so I wouldn't burn myself.) In places where the armor was too tight, I simply cut the seams and hotglued strips or wedges of craft foam in between them until the correct fit was achieved.
I added a flange to the bottom of the bodice and this was what my project looked like:

Once I had my foam pattern completely worked out, I then cut the seams of the shell so that I had my flat separate pattern pieces again. Placing my pattern pieces on my roll of plastic sheeting, I cut generously around them. I then hotglued plastic to each foam pattern piece. Gluing large pieces like this presents it's own unique set of difficulties; if you apply too much glue, the surface of the thermally-sensitive plastic will melt and warp and not fit smoothly over the foam (and over a wide surface area like a breastplate, such mistakes become all the more apparent.) It's best to glue the plastic on in short segments at a time (being careful not to accidentally crease the plastic as you apply additional glue to the surface of your foam.)
After gluing the plastic sheeting to each pattern component, I then glued the pattern pieces together to create the front and back halves of my breastplate. Hotgluing together pieces which have been covered with plastic can be tricky, particularly if you need a neat, straight edge between them (like down the front seam of the breastplate.) It's best to glue the pieces together at the edge as closely as possible, then carve away the excess plastic with your craft/X-acto knife. If there are any gaps or spaces between the plastic edges after this, apply hotglue to the inner edges of these spaces (using a scrap of plastic as an applicator) and then hold them closed with your fingers (trying NOT to burn yourself or get excess glue all over the surface of your armor) until the glue cools.
So then, what I had at this stage of the game, were the front and back pieces of my armor fully coated and shaped to look like something that would fit around my body (without the aid of disfiguring surgery.) For added security, I ran a needle and thread through the armor, tacking pieces together at the edges where the threads wouldn't be readily visible (or would be covered up with decoration.)
The next step was to apply the various ridges and surface decoration. This I did by cutting long strips of 3 mm craft foam and applying them to the surface of the armor with glue. I then secured them to the armor by running a needle and thread through them. Once all the decoration had been sewn on, I hotglued a strip of plastic sheeting over the raised areas, carved away the excess with a craft knife and voila, I had a raised decoration with a nice smooth surface, to match the rest of the armor.
Here's what I had at this point in the process:

The next stage in the process was to paint the armor. You can see how I laid down the paint in this example, mixing the silver with black and dabbing it on to bring out the raised decoration. (It looks better and less muddy in real life than it does in this crappy digital photo, but you can sort of get an idea the principles behind my painting technique.)

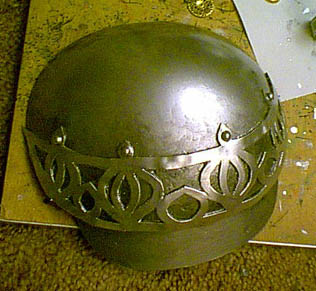
Here's what the pauldrons looked like after the painting was finished:
I built the foot armor by layering and gluing 2mm thick foam and polystyrene sheeting around an old pair of shoes and then reinforcing the plates with stitches in a couple of key places. I took care to only glue (and sew) the bottom edges of the plates near the sole to leave room for movement between the plates at the top. (Which makes the shoes infinitely easier to walk in.)
Here's what they look like once painted:

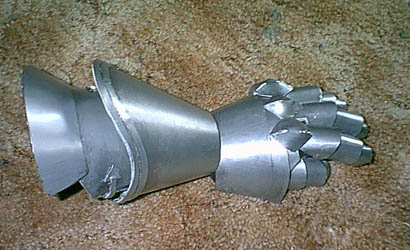
I made them in two different sections--the cuff and the glove. The glove I made by taking foam and plastic sheeting (which I warmed into a slightly curved shape using a curling iron) and making scale-like fingerplates out of them. The fingerplates I then tacked onto a brown work-glove (with a few stitches on either side of the finger). The rest of the plates-- and the pattern for the gauntlet itself--I just kind of eyeballed using an actual pattern for a metal gauntlet that I had found on an armorer's website, the reference pictures I had of Lady Chris, and some impressive Lady Chris-style armor I saw on the website of a professional Japanese costumer who works with foam and vinyl. The joints are articulated and the gauntlet has a pretty good range of movement. (I won't be able to crochet or do anything of that nature while I'm wearing them, but I can still grip things reasonably well.) The fingerplates do look kind of stubby, I'll admit. (Although that might have something to do with the fact that I have really stubby, sausage-like fingers. No wonder my cats are always trying to bite them.)
By the way, the cost for all the materials I used to make the armor came out to roughly 50 dollars. (I suspect now that I know what I'm doing and am less wasteful with materials, that the actual figure for this project if I chose to do it in the future would be less than that. But probably not less than 30 dollars.)
Oh, and the time I've spent on the armor up to this point-- about 40 hours for experimentation and development and about 40 hours for actual construction. (The time has gone down considerably now that I've had some practice, but still, I can expect to spend at least 30 hours trying to work out and construct an average-sized armor piece.) It would be wise to give yourself plenty of time (at least two months) if you yourself are ever planning on undertaking an armoring project of this nature.
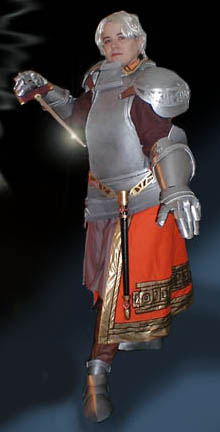
Me.
Kick-ass armor version
Click below to see how I made my
Lina Inverse-Style Shoulder Pauldrons
SUPPORT THIS PAGE!
All anime characters featured are copyright their respective owners.
All costumes created by and all pictures property of Amethyst Angel c. 2005
