

Project 5 - Sun Shang Xiang Soul Chakram
So now I had a ring that was completely encased in plastic. To complete the chakram, I had to have TWO rings, so I repeated the entire above-mentioned process. That done, I set to work on the blade of the chakram. I worked out the shape of the blade by placing newpaper under the rings and tracing out a pattern for it. I then used the pattern to cut two identical blade-shaped pieces of plastic. Lining up the edges of the blades together, I lay some hotglue in between them (at the outer edges only) and pressed them together. I pinched off any excess hotglue with my fingers and scraped the edge of the blade clean with my fingernail. (Later I would sand the edge smooth with model sandpaper, which is available in the model section of most craft stores. Do NOT use regular sandpaper, as it will only scratch up the surface of the plastic.)
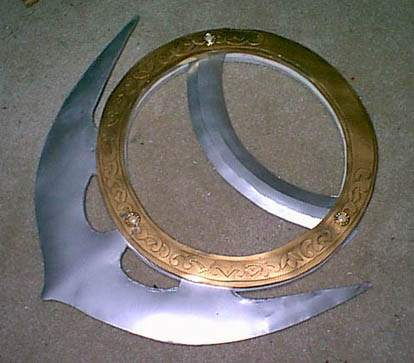
The center arced blade that sits in the middle of the ring (and which seems to serve no real useful purpose as far as the weapon is concerned,) was made by cutting foamcore into an arc shape and carving it so that it had a center ridge with two curved edges sloping down from it. I laid down a strip of thin curved craft foam upon the center ridge to give it more depth and to give it a cleaner edge. (Note the black strip which runs through the center of the blade: that's where I glued the craft foam.) Note: The edge only appears on one side of the blade. The other side is blank. If I tried having the edge on both sides, the piece would've been too thick to fit between the two rings. I glued plastic sheeting to the center ridge first. Then separately to both sloping ridges (the sloping ridges were slightly conical, so I had to use arched pieces of plastic to make sure their entire surfaces were covered.) I then carved away any excess plastic which overlapped between the ridge edges (this was a difficult task as the edges had to be extremely clean and precise to appear as if they were all sharpened planes of the same piece of metal.)
Oh, and see that blank area of the ring where there is no decoration? That's where the handle of the chakram will go so gluing decoration to it is not necessary.
I painted the gems using green metallic testor's model paint and once everything had dried, I assembled the pieces of the chakram together with hotglue. Once the hotlgue had cooled, I painted the interior surfaces of the rings and the ends of the blades (being careful to cover every inch of visible surface.)
And here are some pics of the finished props and the costume I made to go with them.
The weapons were a big hit with the congoers at AZ, and I don't think the costume would have made nearly the impression it did without them. If you're thinking of making them yourself, I'd recommend that budgeting at least 20 hours (or 2 months, if you like to work on things like this in your spare time) to complete them. I'd also reckon on spending at least 40 dollars on materials.
Next Project: Link's Mirror Shield

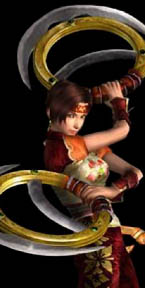
One of my more challenging armoring projects. I made these prop weapons for my Dynasty Warriors 4 cosplay (first worn at Animazement 2004.) I wanted to make these weapons because they looked kickass and I knew they would be sure to have a huge "wow" factor. I also knew, however, that I could never make them out of wood or metal (I lacked the equipment and skills to do so. And even if I HAD been able to use such materials, I knew I would never have been able to lift the chakram once I had finished with them.)
I decided to use foamcore as the base material for the props. I cut two large circular rings out of a sheet of foamcore with a craft knife, matched them up to see that they were the exact same shape and had the same width on all sides, and then hotglued them together into a single thick ring. I then glued one side of the ring to a large sheet of styrene plastic and, using my craft knife, I carefully cut the ring free of it. I repeated the process on the other side and soon I had myself a thick foamcore ring with plastic on both sides. I then cut a loooooong strip of plastic (about 1/2" wide) and glued it to the outer edge of the ring. Taking my craft knife, I carefully cut away any plastic that was overlapping the edge. (It's hard to get it perfect. If there were any gaps between the edges of the plastic planes, I filled them in with paperclay.) I repeated the process for the inner edge of the ring.
Cooooool.
I achieved the thickness of the blade by taking 1/4" craft foam and gluing it between the two sheets of plastic at the inner edge of the blade. (I cut it to shape so it would fit snug around the "holes". You can see the white areas in the blade in the picture below. Those were the areas where I had glued the craft foam.) I used sturdier foamcore pieces to thicken the sharp pointy edges which hung out at the sides of the chakram. (Craft foam doesn't have enough support for those areas, which are always getting hit or bumped by something. Or someone.)

You still with me? Good.
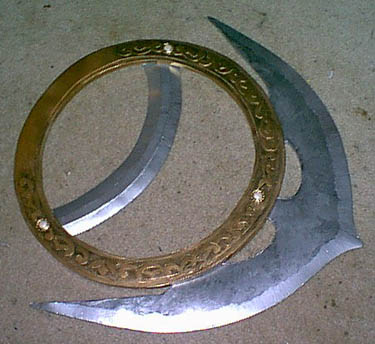
The next step was to glue the decoration to the outer surfaces of both foamcore rings. This was probably the most difficult part as it required the most time and precision. The tiny scrolls which made up the decoration were cut out of 2mm craft foam and hotglued to the surface of the rings. I then laid a generous layer of hotglue over the surface of the raised decoration (over small areas at a time) and pressed scraps of plastic sheeting into them. I then carved away any plastic which was not over the white areas of craft foam. (This was, of course, easy to do because the plastic I used was transparent. If the plastic had not been transparent, I would have cut out the scrolls from the craft foam, glued them to the plastic sheeting first, cut all the excess plastic around them, and THEN glued them to the surface of the ring.)
If I were ever to do this project again (and that's a big IF), I would use Gem-Tac to draw the decoration around the ring. It would have been a lot faster and would probably not have made much of a difference, appearancewise.
The gemstone decorations were plastic pearl buttons. (Michael's sells huge assortment bags of plastic decorative buttons which are perfect for craft projects like this. They cost around 4 dollars or so. Extra tip: If you remove the plastic pearl buttons from their "gold" settings, they make nice rivet studs for any costume armor project which requires them.)
Once the construction of the rings and the blades had been completed, I began to paint them. (I highly recommend painting each prop component separately before trying to glue them together. You should take care not to get paint on any area which might have to be glued later. For instance, paint should not be applied to the areas of the blades which lie between the two rings, and I'd leave off painting the inner surfaces of the rings for now.) I used testor's spray paint for the initial coat. (I taped off those areas I did not want to have painted with masking tape.) Here's how it looked after the first coat:
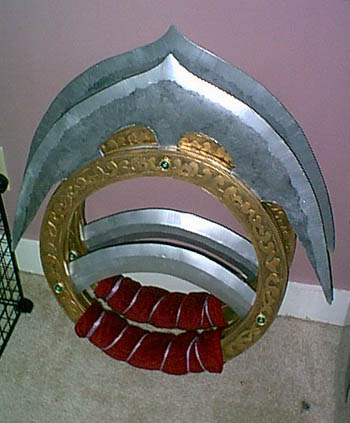
Once the first coat had dried, it was time to paint on the fine details. I antiqued the ring section by mixing gold paint with black and dabbing darker areas of paint onto the ring around the surface decoration. (To the raised decoration itself, I applied pure gold paint to make it stand out more.) The blades were a bit tricky. To the arced blade which sat in the middle of the ring, I painted silver in long, clean streaks to each edge, to give it the appearance of a sharpened blade. For the larger, shaped blade, I mixed silver paint with black and dabbed short strokes of randomly shaded paint over most of the blade's surface, to give it the appearance of a ground surface. To create the sharply polished edge of the blade, I used long, thin clean strokes of pure silver about and inch long and 1/4" thick.
When the paint had completely dried (it's good to wait at least a day or two,) I set about making the handle. First, I cut a strip of cotton batting and wrapped it around the undecorated section of the ring at the bottom of the chakram for extra padding. I then cut a long strip of red velvet, hemmed all the edges and painted a Chinese pattern onto it with a dark fabric marker. After the marker dried, I wrapped the velvet around the cotton batting and secured it by wrapping a length of purple braid around it. I tied off the braid and sewed it's ends to the velvet to keep them from fraying.
That being done, I had to repeat the whooooooooole process to create the other chakram.
Here's that they looked like once I had finished them:


SUPPORT THIS PAGE!
All anime characters featured are copyright their respective owners.
All costumes created by and all pictures property of Amethyst Angel c. 2005
