

Basics of Armor Construction
Once you've determined the number of pieces you'll need to construct your armor and what shape and size each individual piece will be, you are ready to begin making the pieces out of foam and plastic. First step is to lay your cardboard pattern over a piece of craft foam, trace around it and cut it out. (You may have to hotglue sheets of craft foam edge to edge if the pattern piece is too large to fit over a single individual sheet.) Once you have cut all your pieces from the foam, the next step is to cover the pieces with the plastic sheeting.
Next step is to apply hotglue to surface of the foam. If the piece you're working on is large, it might be wise to apply the glue and overlay the plastic in small sections at a time, --otherwise if you try gluing it all in one go, areas of the glue might cool on you before you get the chance to lay down the plastic sheeting. Take care not to apply too much glue, --if the area you're gluing becomes too hot, the plastic might buckle and warp when you try to lay it down.
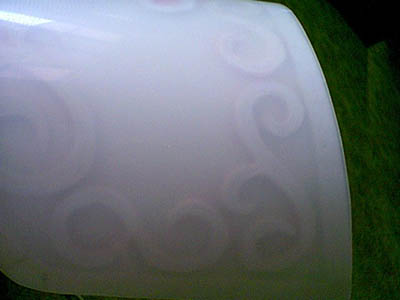
Next step is to cover the scrollwork with plastic sheeting. Determine the size and shape of plastic sheeting you'll need to cover the decoration--being as generous as you can in your estimation-- and cut it out. Apply hotglue to the surface of the decoration, making sure not to miss any spots. Press the plastic sheeting onto the decoration very carefully, making sure all surface areas of the scrollwork are touched by the plastic. Hold the plastic in place until it cools.
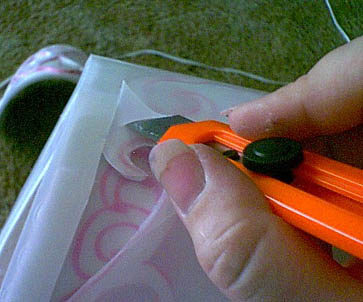
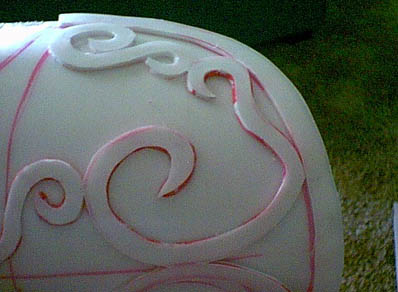
Now comes the fun part. Take your craft/X-acto knife and use it to carve away all the plastic which isn't sitting on top of the raised decoration. Polystyrene can be hell to carve when you're working with curves so be VERY careful. Use a light touch. Try to avoid slashing your own wrists (either accidentally or out of frustration.) Try not to slice into the foam if you can avoid it. (Foam, while it's easy to cut with a scissors, leaves rough, shreddy edges if you cut it with a craft blade.)
This is roughly what you should have when you are finished...
Once you have all of your armor pieces constructed, you can then begin painting them.
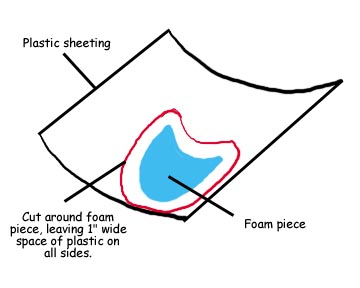
Step One: Roll out your sheeting and then place one of your foam pieces onto it. Trace around it with a marker, leaving a generous area of sheeting (about 1" wide) around the piece. (You don't want to be cutting it too close; you'll see why in a moment.) Cut the traced area of sheeting out with a heavy scissors. Do the same for all of your armor pieces.
Now comes the tricky bit--pressing the plastic sheeting onto the foam. It would be wise to touch the plastic to the foam at one edge and gently press it towards the other edge. If your armor is something which has a curve to it (like, say, a bracer which goes around the forearm) you should curl the armor in your hands as you press the plastic on. At this point, you'll discover the reason why it was so important for you --back when you were cutting out the sheeting--to leave a generous area of sheeting around the foam; curling the armor will create more surface area on the outside of the armor than on the inside. (If you had cut the plastic to exactly match the foam piece, then you'd now be finding yourself in a situation where you didn't have enough plastic to cover the surface of the foam.) You'll notice, once the glue has cooled, that the armor will retain it's curled shape, thanks to the surface tension created by the now-cool layer of glue. One thing to be careful of here: Do not, I repeat, DO NOT curl the armor TOO much. Foam is sproingy, and if you curl an armor piece too far it will spring back, creating ripples in the surface of the plastic once it cools. Best to only give it only a slight curl --or to not curl it at all --than to curl it too much.
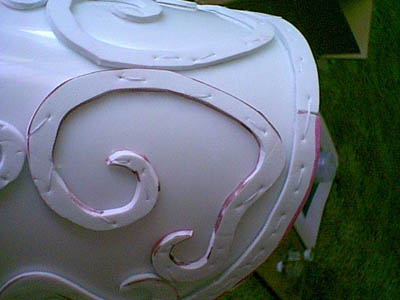
If your piece has any sort of edge or decoration to it, then now's the time to apply it. In the case of the Zelda armor, the decoration consisted mainly of scrollwork. This I cut out of 2mm craft foam which I glued to the surface of the armor. I then took a needle and thread and tacked down the decoration for added security. You can see the kinds of threads I made in the picture below. It's not pretty, but then again, it's not meant to be seen. You'll most likely need a pliers to pull your needle and thread through the various layers of foam, plastic and glue you'll have at this point. (Try to be as precise as you can. It may be hard to determine the position of the needle when you try to push it from one side of the armor to the other, but it shouldn't be impossible.)
NOTE: If the styrene sheeting you bought is opaque, you'll have to do the above steps differently. You'll have to cut the decoration out of foam, glue it to the plastic first, cut it free of the plastic and THEN hotglue it to the surface of the armor. (You can tack it down by using small stitches at the edges of the decoration.)
Note X 2: If you want to create a more organic, flowing type of raised decoration, draw it on with Gem-Tac (that adhesive stuff I mentioned earlier in the Materials section,) and let it dry for at least a day. It should dry tough and flexible. (If the design you want to create has lots of fine detail or scrollwork, you may find it easier to create with Gem-Tac. If your raised design has lots of sharp edges or clean, precise lines, you'd be better off sticking to the plastic-covered foam. )
Page 5 : Painting Your Armor
SUPPORT THIS PAGE!
All anime characters featured are copyright their respective owners.
All costumes created by and all pictures property of Amethyst Angel c. 2005
